Astrophotography 101 - Photographing the Moon
Jack Kramer
When I finally got a telescope with a motor-driven mounting, I decided to seriously try my hand at photography through the telescope. Not having the equipment (and patience) that's required for long-tracking exposures of faint fuzzies, I looked elsewhere. The moon is a bright target with lots of prominent detail. That would be a good starting point.
But getting a really good shot of the moon is a bit harder than it looks. One problem was addressed in the book Introduction to Observing and Photographing the Solar System by Dobbins, Parker, and Capen. The authors state: "The Moon presents a special problem for the astrophotographer. As the Moon waxes and wanes, the angle of incidence of sunlight changes. Also, there is a wide range of brightness between the limb and terminator regions." In the following illustration, we are looking at the moon from down over one of its poles. From the Earth, the moon would appear at a quarter phase. It's easy to see how the angle of incidence of the sunlight becomes much steeper near the terminator and the total amount of light changes with the different lunar phases.
As a result of this varying angle of incidence, shadows are longer near the terminator, allowing surface details to stand out much better. For the same reason, the limb is much brighter and far less detailed. Thus, it's impossible to take a single shot of the moon that will show the same level of detail uniformly over the entire surface. images of the entire lunar surface that are used to show maximum detail, as in the case of an atlas of the moon, are invariably composites of many photographs taken during various phases.
The fact that the moon is such a bright body means that you don't need a super fast film and the exposure can be relatively short. You're more likely to overexpose your shot of the moon than underexpose it. Thus you can use slower, finer-grained films that will show better detail in the finished shot. On the other hand, faster films allow very short exposures, which minimizes an out-of-focus appearance due to tracking errors and tremors in the telescope due to shutter slap. In fact, some people have gotten decent results just with a hand-held camera, provided the exposure is short enough.
When it comes to shutter speed, books on astrophotography often provide formulas that take into account the varying luminance of the moon. It's a moving target, because each lunar phase is slightly different. Always bracket your exposures; in other words, take lots of shots at a wide range of shutter speeds. Among the factors that affect the results is the light gathering ability of the telescope. The image in a larger telescope, of course, will be brighter. The difference is actually greater than your eyes would lead you to believe. Most successful lunar photographers will tell you that they did a lot of experimenting until they found the combination that gave the best results.
In recent years I've used ISO 400 and 800 color films and ISO 1600 black and white film on the moon. With the moon at first quarter using Kodak Royal Gold 400 film, I've found the best results with a shutter speed around 1/8 second. There wasn't a great difference in the resulting prints when compared to the bracketed exposures on either side - 1/4 second and 1/15 second. Using this same setup with Fuji Neopan 1600 B&W film, the best results were in the range of 1/15 to 1/60 second. The telescope was a 4-inch refractor, using negative projection; that is, with a 2x Barlow lens in the telescope, and no eyepiece or camera lens. If it were prime focus (no Barlow lens), then the shutter speeds could be somewhat faster. Also, a larger telescope would make it possible to use a faster shutter speed.
If you further magnify the image by shooting with an eyepiece in the telescope, then you've made the image fainter and must compensate with a longer photographic exposure. Using a 19mm eyepiece with Neopan 1600 film gave the best images in the 1/2 to 1/4 second range. Using the "afocal" method, with both an eyepiece and camera lens, will further increase the exposure.
images taken at lower magnification will appear sharper, so they're more "aesthetically" pleasing. Of course, if you want to home in on some minute detail, this will really test your system.
With a computer and scanner, you can scan a printed photo into your computer, then use image-processing software to improve the quality of the original shot. A good scanner should not significantly degrade this second-generation image.
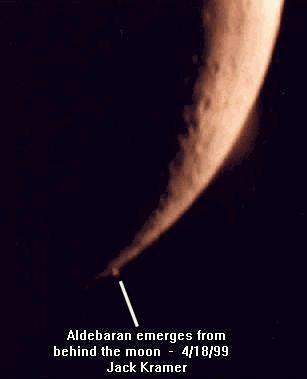
The most difficult of all lunar shots are the ones where you are combining the moon with some other object. The moon will always be considerably brighter. On one occasion, I was photographing the occultation of the star Aldebaran, so it was necessary to achieve an exposure that would show the moon as well as the much fainter star. That made the shot especially tricky. This makes you greatly appreciate the skill of those who get a good photo of a planetary occultation. With ISO 800 film and just a three-day-old moon, the moon was overexposed on every frame. I thought the images would come out much fainter and had not bracketed enough. (An added factor was a pretty stiff wind that night which caused tremors in the telescope.) One of my shots is shown below.
Another way to shoot the moon is with an ordinary digital camera. Many of the same rules apply as in film photography. Since the exposures are very short, surprisingly good results can be achieved just by hand-holding the camera. But for the very best results, the camera should be mounted to the telescope and a self-timing shutter feature on the camera will help ensure there are no jiggles at the moment of exposure. Of course, with a digital camera, there's no shutter slap.
Just as with film photography, digital imaging calls for bracketing your exposures. Digital cameras are more sensitive than most film, so there is an even greater tendency to over-expose. But photographing with a digital camera is far easier than with film, in large measure due to the ability to view the image on the camera screen while you're taking it and adjust the settings in the process. As a result, I now use digital imaging exclusively.
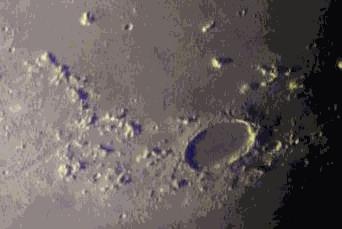
The following digital camera image of Plato and the Alpine Valley was taken through my 4-inch refractor using a 10mm Radian eyepiece (98x) and an exposure of 1/30 second. This was an effort to capture a relatively confined area on the moon. Due to the fact that this is an achromatic telescope, there's a bit of chromatic aberration evident. To minimize this, the color image can be converted to grayscale. At lower magnifications, chromatic aberration becomes much less evident.
�
Finally, it's also possible to use a CCD camera for lunar imaging, but since CCDs are extremely sensitive, the exposures must be very short. Michael Purcell has a fine CCD photomosaic of the moon on the LCAS web site. The exposures were each only 0.1 second long.
Despite image processing, a film or digital photo cannot be made to show more detail than you've been able to capture with the original media. You can sharpen it, brighten it, and otherwise improve the image, but you can't show something that isn't there to begin with. To get better images often requires an investment in better equipment. The best lunar images are taken with telescopes and eyepieces that provide high resolution and contrast. Since the moon is a bright object, light gathering itself is of lesser importance.
The foregoing has been the result of trial and error, plus info from a variety of sources. I can't claim any great expertise as an astrophotographer. Out of 24 exposures on a roll of film, I would typically be lucky if there were three or four reasonably good shots of the moon. I've had much better and more consistent results with a digital camera. But the best images can't generally compare to most of the work published in the astronomy press. However, the more experience you acquire, the better your results will be. Those photographers whose lunar images we admire will usually confide that they had blown a lot of shots before getting to the point where they achieved consistently good results. But when you get that one shot where you can actually see and identify some minute detail, it makes all the effort worthwhile.
... published in the August 2001 issue of the NightTimes


