Digital Camera Imaging - Phase II
Jack Kramer
In an article last year, I related my first exploits with a consumer-type digital camera. Since then, I've learned a lot from others and from my own trial and error. If you're interested in digital astro-imaging, here's a "Phase II" update. There has been a major increase in the number of amateur astronomers using digital cameras ("digicams") in place of film type cameras. Notice the photos now appearing in the astronomy magazines. The great thing about digicams is that there's no film and no developing; you take the shot then check to see how it turned out. Instant gratification!
Selecting a Camera
There are new digital cameras coming on the market constantly, but certain models have features that make them especially suitable for astrophotography. (You'll no doubt also use the camera for pictures other than just astrophotos.) Most astro imagers tend to use Nikon Coolpix or Olympus cameras, both of which have models with several advanced features that I wish I had on my Sony S70. There is a web site that is handy for comparing the features of the different products: http://www.dpreview.com/
While it's good to get the highest resolution possible, fine images have been taken with cameras of lower resolution. Some users claim that unless you intend to really enlarge the images, you won't detect a difference between 2.1 and 3.3 megapixel cameras. To put this in perspective, the sensor chip in a $500 digicam with 2048x1536 resolution (3.3MP) has more pixels than some CCD cameras costing $5000 or more!
Here's a list of desirable features for astro imaging:
- Manual control of everything
- Shutter speed of at least 16 seconds
- Remote control or self-timer to fire off the shots
- Lens threaded for filters (required for some of the camera-to-eyepiece adapters)
- Optical zoom of at least 3x
- Resolution of at least 1200x1600 (2.1 MP)
Digital Cameras vs CCDs
So what is the difference between a digital camera and CCD imaging equipment intended for astronomy? The technology is similar. One advantage is that I can pop a digicam on my scope and take a full-color image, but most CCD users must go through the task of using red, green, and blue filters and combining separate images to get a color picture. And a PC has to be hooked up to the CCD camera. Do digital cameras spell the end of traditional CCD imaging among amateur astronomers? Hardly. There are still some important differences.
First of all, digital cameras cannot take long exposures; many only go up to 8 seconds. However a few models will do 60 seconds and the new Nikon Coolpix 5000 has a bulb setting that will expose for up to 5 minutes. One reason for short exposures is that a color CCD chip has problems with color bleeding between pixels during a long exposure. Secondly, a long digital exposure results in "noise" in the image. These are random dots on the image resulting from heat generated by the electronics. That's why the better CCD cameras are cooled. Digital cameras are useful for solar system objects and the very brightest deep sky objects where really long exposures aren't needed. When I first started digital imaging, I thought the camera had captured many faint background stars. Turns out those "stars" were just electronic noise! A CCD chip intended for astronomical imaging is also large in area (often with larger pixel sizes), backlit for better blue response, and thin to reduce light loss.
Camera-to-Eyepiece Adapter
It's important to have an adapter of some sort to affix the camera to the eyepiece so you don't have to hand-hold it. Obviously, your camera has to have a self-timer or remote feature so you don't have to touch the camera when activating the shutter. While several good commercially made adapters have come on the market, it's not difficult to make your own. Using PVC fittings, sheet styrene for shimming, and nylon screws, I made two adapters, one for each eyepiece that I use most for imaging - a 19mm Panoptic and 10mm Radian. The adapters mount to the eyepieces themselves, and fit a number of other eyepieces, as well as 11/4" and 2" focuser tubes.
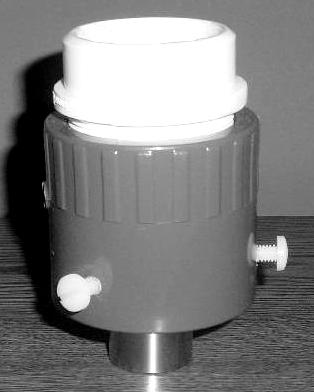
A trip to a well-equipped hardware store should net you some PVC fittings that are close to the right size to go around the eyepiece and around the lens housing of your camera. You might also have to cut some material off to shorten them. The sheet styrene is used to make a shim strip if the opening has to be made a bit smaller. A Dremel Moto Tool with the little drum sander was used to ream out PVC fittings that were a bit too snug. I drilled and tapped 1/4-20 holes for nylon screws that provide a secure fit to the eyepiece barrels. (Plastic is easy to drill and tap, even by hand.) The fitting that mates with the camera goes on the collar around the lens housing. To ensure a secure fit here, I used my finger to wipe a film of silicon sealer on the inside circumference of the PVC fitting. Each of the digicam mounts cost about $10.00. To use the zoom feature on your camera, make sure that there is enough room within the mount for the camera lens to move without smacking the eyepiece. Finally, it's a good idea to paint the inside of the adapter flat black to avoid any internal reflections.
Taking the Image
I've tried several different eyepieces and discovered that certain ones are better for digital imaging. With their wide fields and longer eye relief, the Tele Vue Radian and Panoptic give full-field illumination, thus minimizing vignetting (light fall-off at the edge of the field). Another advantage of using Tele Vue brand eyepieces is that they have grooves milled into their barrels; this ensures that they won't slip out of the focuser or star diagonal due to the weight of the digicam. That said, some of the sharpest and most color-correct images that I ever got were with a plain old 5mm Orthoscopic eyepiece.
The zoom feature of digicams allows one to capture a larger image, but use only the optical zoom, not the digital zoom. Digital zoom only extrapolates the pixels, and does not result in any gain of detail.
I visually focus the telescope as sharply as possible and set the camera focus at infinity. The camera lens is positioned as close as possible to the eye lens of the eyepiece. However, with certain eyepieces you may have to touch up the focus using the camera screen. Focusing is probably the biggest problem; the answer is lots of experimentation.
There is no substitute for a telescope/eyepiece combination that gives sharp, high contrast views. And if atmospheric seeing conditions are not stable, the focus can change non-uniformly across an area. The human eye is more accommodating and tends to equalize things. A time-based exposure is not so forgiving and can display various amounts of de-focus, even at different points in the field of view.
The camera is normally set for shutter priority and several shots are taken at different shutter speeds. A long exposure captures moments of atmospheric instability that "smear" the image. The sharpest images will result from faster shutter speeds, which diminish the effects of any shakes. Although the raw image will be darker, with processing it can be lightened and several images can be stacked to achieve the effect of a longer exposure. It's best to slightly underexpose because you can boost the pixel values by processing, but once overexposed, the pixel values peak and start to degrade the image. Try the different settings to see which ones work best for you. Experienced digicam users also take many, many images. Some have taken over a hundred images of the same object then selected perhaps a dozen of the best for later processing. I've taken a number of images one right after the other without changing the camera settings, and invariably one or two will be better than the rest. They apparently were taken at a moment when everything was just right. (But you can't spend a lot of time taking multiple images of Jupiter - it rotates so quickly that the motion will eventually smear a stacked image.)
Improving the Image
Taking a cue from CCD users, there is image-processing software that allows you to bring out hidden details in an otherwise uninspiring image. The details are not being added - they were there all along. Processing simply employs algorithms that refine the pixels so that taken together, they reveal more of what was actually captured.
There are ways to get around some of the electronic noise problems during longer exposures. One answer is to turn off the camera's viewing screen before taking the image; the screen generates a small amount of electronic heat. You will also get less noise in your image when shooting on a cold night.
Another solution is to use dark frames. To use a dark frame, you first take an image with the lens cover on the camera or telescope. The resulting image should be totally black, although there may still be a few small spots of "noise". You then subtract the dark frame from the image. The noise will be gone, though this somewhat darkens the image.
One of the most often used procedures is to take a succession of short images, then stack the best images with software. Stacking simply overlays one image on top of another to cancel most of the noise and reinforce the details in the object photographed. For example, you could stack ten 8 second exposures of M42 to get about the equivalent of one 80 second image. Digicam users have taken amazingly good images of bright deep sky objects, sometimes stacking twenty or more exposures. The image of Saturn here is a stacked combination of four 1/30 second exposures taken one right after the other through my 4-inch refractor. CCD users sometimes stack images, but their final result may represent a total exposure of an hour or more - far longer than with a digital camera. This allows CCDs to capture faint deep sky objects well beyond the capability of the most sophisticated digicam.
Software that is intended for astronomical processing generally includes deconvolution. The software can examine each pixel individually and within the context of its surroundings, find the detail that was thrown about. The detail is there - it's just "convolved" with the rest of the image. When the software is presented with the radius and type of blur, it can scan the image and retrieve subtle details. Multiple passes (iterations) are used to gradually tease out this buried information. Various algorithms are used which are chosen mainly on the nature of the image and the information to be extracted. It's amazing to watch details emerge before your very eyes!
Image Processing Software
I've used a succession of different image programs that came packaged with scanners and printers. These include MGI Photo Suite, Presto Page Manager, and Adobe PhotoDeluxe, plus the various image programs that come with the Windows operating system. All of them allow some image processing, but don't have many useful enhancements for astro images. Years ago, Michael Purcell suggested LView Pro, which is a piece of shareware that does several things better and more easily than the programs I've already mentioned. I still come back to LView for some things. The web site for downloading is: http://www.lview2.com/down2.0.htm. For anyone just starting out in astronomical image processing, LView Pro is a good first step.
Once you get your feet wet, you'll want to try stacking, deconvolution, and unsharp masking. For this there is AstroStack - a freeware program that is especially easy to use for stacking because it allows you to register ("line-up") several images. The AstroStack web site is:
http://utopia.ision.nl/users/rjstek/english/software/
The main drawback of AstroStack is the small image size that it handles; this makes it unsuitable for large-scale images of the moon and sun. A new, improved version of AstroStack is in the works, however.
I also bought Paint Shop Pro, which offers important features such as stacking, color separation, layering, plus a host of additional image processing tools. Paint Shop Pro is one of the most popular pieces of software among digital camera users. But one problem is that it offers no means to align images to be stacked. However, it does include a feature called "JPEG Artifact Removal", which happens to do a dandy job of removing much of the electronic noise.
Other programs focus on certain discrete tasks. For example, SGBNR is a freeware program designed just to remove digital noise. It's available at:
http://www.pleiades-astrophoto.com/software/en.html
Since most software has both strong and weak points, it's not uncommon for astrophotographers to use two or more different programs to process an image. For an ongoing discussion of astronomical imaging with a digicam, plus many additional resources, you might want to join an Internet discussion group devoted to this subject: http://groups.yahoo.com/group/digital_astro
And here's a helpful Internet FAQ page on digicam astrophotography:
http://users.erols.com/szykman/Astro/AstroDigiCamFAQ.html
The Future of Astronomical Digicam Imaging
Based on comments from those who have used both digital cameras and entry-level CCD cameras (which each cost about the same), the digicam wins out overall - in ease of use, features, and resolution. The higher end CCD cameras are still far superior for imaging faint deep sky objects. But with their extensive resources, firms like Nikon and Olympus will no doubt continue to introduce new features on their cameras, narrowing the gap between digital cameras and CCD equipment for amateur astronomers. Some new digicams have built-in noise reduction and a setting for sensitivity emulating film speeds from ISO 100 to 800. Plus, sensor chip makers are constantly advancing the state of the art. A traditional digital camera sensor captures just one color (red, green or blue) at each pixel location. These individual pixels are combined by software to produce a full color pixel. But a newly released sensor (the Foveon X30) is the first to capture full color in every pixel of its array. This results in sharper images, better color, and freedom from color artifacts common in present digital cameras.
Moreover, astrophotographers now have a diversity of electronic equipment from which to choose. There was a poll conducted during January 2002 on the Digital Planets Internet group asking members what type of cameras they use for high-resolution imaging of the planets, moon and sun. The results were 23% for cooled monochrome CCD cameras, 3% for cooled color CCD cameras, 23% for video cameras, 17% for webcams, and 33% for digital cameras.
Finally, even though amateur astronomers will no doubt continue to use film photography for awhile, it appears to be losing ground to electronic imaging of all types. Dennis Persyk, a digicam astrophotographer from Hampshire, Illinois, commented on what many of us have found: "The basic digital camera is still way better than the most sophisticated film camera in my opinion - and a lot more fun."
Published in the April 2002 issue of the NightTimes


