Stretching your Telescope
Jack Kramer
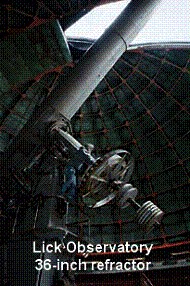
An article about Lick Observatory in the June 2004 S&T related how this historic institution has held onto its relevance using state of the art equipment. It is home to a 36-inch refractor built in 1888 and several more modern telescopes, none of which are considered large by today's standards. Lick is also faced with growing light pollution from nearby San Jose, California. In the article, Remington Stone, Lick's principal administrator, is quoted as saying, "... with modern detectors and equipment, there's no reason a telescope can't have an extremely long life."
This got me thinking about our own telescopes. If observatories with hundred-year-old telescopes can still do useful work, there must also be some things we can do to extend the capabilities of our own telescopes to forestall aperture fever.
There are a few assumptions we need to make.
- First, our present telescope performs well enough within the limits of its design.
- Secondly, we find it advantageous that our present scope is portable and easy to set up. (This might deter one from getting a larger scope with greater light grasp ... and with a corresponding increase in size and weight.)
- Finally, we have some funds that can be allocated to upgrading.
It's a truism that no sooner does the average amateur get a new telescope than he or she starts looking for "add-ons". Eyepieces are the most frequent of these, but there are other ways to expand your capabilities.
Eyepieces - Admittedly, few enhancements can top a good set of eyepieces. Check out the article: Your Eyepiece Collection In fact, people who want to make a department store telescope usable are always advised to throw away the chintzy eyepieces that came with it and get some better ones. Good eyepieces help improve the view in any telescope, though they cannot compensate for a poor quality primary mirror or lens.
Filters - There are all kinds - colored filters to bring out certain features of a planet, filters to attenuate the chromatic aberration of achromatic refractors, and those that allow you to get a clearer view of certain objects. Of the latter type, the most common are what we often refer to as "nebula filters". And the most useful of these are the general use narrow band filters such as the UHC or Orion Ultrablock , followed by the more restrictive line filters such as Oxygen III and Hydrogen Beta . By passing only certain wavelengths at which nebulae radiate energy, these filters provide very fine views of emission nebulosity even from light polluted environs. The broadband "light pollution" filters that pass more wavelengths of light are of little use visually, but intended more for photographic work. However, on a small telescope they may be more useful because narrow band filters need a higher level of light gathering in order to be effective.
Solar Observing - To some extent, this category of accessories falls under "filters", but solar observing is a whole different topic. Regular solar filters provide a "white light" image that reveals sunspots and faculae. I have three solar filters - aluminized mylar, glass, and Baader Astro-Solar film. Of these, the Astro-Solar film provides a noticeably sharper image. If your scope is of the truss tube design, you will need a black shroud to darken the background. Scattered daylight makes the sun almost impossible to see in an open-tube scope.
In order to see solar prominences and certain other surface details such as flares, you need a hydrogen alpha filter. This transmits an extremely narrow piece of the visual spectrum. H-alpha filters tend to be expensive, especially in the larger sizes. At the low end, Coronado's Personal Solar Telescope (PST) does a pretty good job of showing prominences, but comes up a bit short on surface detail. Nonetheless, at a cost of about $500, it's a real bargain and loads of fun. It's small enough to be easily piggybacked on your main scope, so in a way, this is another enhancement.
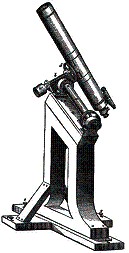
Mounting - It's often said that the mounting is half the telescope. In a way that's true, since even the best scope on a poor mounting will give disappointing results. An equatorial mount may be the preferred design if your goal is astrophotography. The fork mounts that generally come with SCTs can be a source of frustration if some of your accessory equipment won't fit between the fork arms when aimed at certain parts of the sky. A German equatorial mount will solve that problem, but those included with many telescopes are entirely too anemic to adequately support the weight of the scope, especially when you start adding heavy items such as photography gear or a binoviewer. In some cases, the manufacturers' weight ratings of mountings are optimistic. So when choosing a mount, always get one a bit larger than you think you'll need. The picture here shows a personal telescope from the latter half of the 19th Century. Note the stoutness of the mount compared to the telescope.
On the other hand, some people have improved their observing experience by re-mounting their scope from an equatorial to a Dobsonian. One former German equatorial user referred to this as a "liberating" experience. Dobs are inherently the most stable design and some very nice images have been taken through scopes equipped with a Dob driver. These driven platforms also make high power observations much more pleasant. Software is available that will even compensate for field rotation.
Electronics - Today's amateur has high-tech wizardry within reach that was the envy of professionals not so long ago. You can spend a lot, or just a little - it all depends on how serious you are about holding on to your present telescope. At one end there's the electronic image intensifier eyepiece (Collins I3.) At a cost of around $2000, you have to really prefer your present scope over a larger one. Astrophotography ushers in a whole new scenario. It's easy to spend $10,000 or more on a top-end imaging setup. Then there are the imagers available from Orion, Meade, and Celestron that run less than $400. They're somewhat limited compared to higher end CCD cameras, but a bargain for what they do. I think we'll see a lot more new, relatively sophisticated digital imaging equipment at quite reasonable prices.
Just as the advent of CCDs ushered in a whole new era for the professional community a couple of decades ago, the digital medium has greatly changed the way many amateur astronomers now pursue the hobby. Today we have not only dedicated CCD cameras, but also digital cameras, webcams, and video cameras that are available from your local Best Buy. Electronic imagers, assisted by modern image processing software, are more sensitive than film, thus enabling smaller telescopes to capture amazing sights that our eyes would never see just looking through an eyepiece. Where many of us once spent a night visually observing, some now spend it gazing at an LCD screen or monitor and recording detailed pictures on a silicon chip. To appreciate how far we've come, look at any astronomy book printed about fifty years ago. Today an amateur with a good four or six inch telescope is able to take full-color images of objects that surpass what most astronomical observatories were able to do back then.
Paradigm Shift - What observatories do with their old "legacy" telescopes is to re-orient their work toward the unique capabilities of the instruments. For example, the 40-inch refractor at Yerkes Observatory was used extensively for research on the dynamics of star clusters - a field not limited by the light gathering ability of the 40-inch or deteriorated condition of the local sky. If your own scope limits your ability to capture faint fuzzies, consider adjusting your observing agenda. Smaller scopes frequently do quite well on the moon and planets, and on double and variable stars. Smaller scopes do amazingly good wide-field astrophotography too.
Any telescope can be an amazing vehicle for a ride through the universe. Yours is probably up to the task.


