The Hartman Mask
Leon Choin & Bruce Hugo
The Hartman Mask (HM) is a simple yet strong tool to assist in the focusing of your telescope both visually and with a CCD camera.
 Due to the sensitivity of the human eye, larger holes in the HM or a bright star is needed to focus visually. A CCD camera is much more sensitive to light. Smaller holes can be employed and exposure times increased. Large holes and a bright object can cause a too bright image that will saturate the CCD. The star images will blend together which will make it hard to tell when you have reached optimum focus. An advantage to a smaller hole size is the effective separation of the images. The smaller the hole, the further apart you can place their centers. Placement of the 2 (or more) holes at the extreme edges of the maximum aperture of the telescope will make it easier to judge the critical focus position.
On one web site, the author reports: For CCD focusing using my 10" LX200 and 416XT camera I use 1/2" or 3/4" inch holes the full 10" apart, together with an exposure time of between 100 and 200 milliseconds using a magnitude 3 or 4 star.
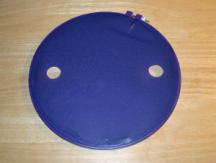
All sorts of materials and methods can be used in creating a HM. One of the more simple ways is as follows. Materials needed: 1) Embroidery hoop, slightly larger than tube diameter 2) Stiff cardboard, foam board, or plastic sheet 3) Foam tape to fill gap between mask and tube 4) Adhesive or glue
Next, you need to plan on the type of HM to create. There are numerous designs. Some employ 2, 3 or 4 circular holes. Others use triangular holes instead of circular. They claim using 2 triangular holes rotated dissimilarly is superior to the round holes because it generates diffraction spikes which aid in optimizing the focus. This has not been tested by the authors of this article at this time.
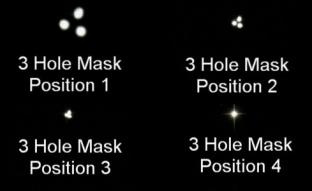
After seeing the HM created by Joe Shuster at the February LCAS meeting, it was decided to create a 2 round hole version. The advantage of the 2 hole mask is as you start to get close to focus the stars move from two separate stars into an elongated star. Finally, when you have focus, you can see only one star. It seems this type is much easier to use than the 3 hole mask. As you start to near focus with the 3 hole mask, the 3 stars become one big star before reaching optimum focus. See focus examples in the club Yahoo! site at Files > Hartman Mask.
Once you have decided on the type of HM, you need to lay out the hole pattern. As noted before, place the holes as far apart as the telescope aperture will allow. You need not be terribly careful about similar size or placement of the two holes.
For the 2 hole mask that was created, a plastic sheet like a cheap plastic table cloth was used. Since this material is very thin, an embroidery hoop is able to clamp it tight, not needing any type of adhesive. The self sticking foam tape was used to fill the gap between the hoop and the telescope tube. The mask fit loose to the tube so it was easy to put on and take off with out causing vibration to the scope.
When using the mask on the telescope, it appears that the mask is a "coarse" adjustment. It gets you really close, but the final has to be done by shooting an image and making the slight "fine" adjustment to get the focus right on. Using Polaris as a bench mark star and shooting a 1/2" second image you can split the two stars and the contrast between the mag 1.97 and 9.1 stars separated by 18" will always be there to adjust your focus by.
When you have the focus optimized, the two stars are cleanly separated and the smaller one shows up nicely. Note focus position 4.
 It would have to be said, finding a great focus is the Holy Grail of astrophotography. Good focus will make your pictures so much better and bring out that extra detail that makes them worth standing out in the cold for. While the mask isn't that perfect fix, it does add to your toolbox to help on that quest to great astrophotography.
Published in the April 2005 issue of the NightTimes
It would have to be said, finding a great focus is the Holy Grail of astrophotography. Good focus will make your pictures so much better and bring out that extra detail that makes them worth standing out in the cold for. While the mask isn't that perfect fix, it does add to your toolbox to help on that quest to great astrophotography.
Published in the April 2005 issue of the NightTimes


