Your Basic "Copyscope"
Jack Kramer
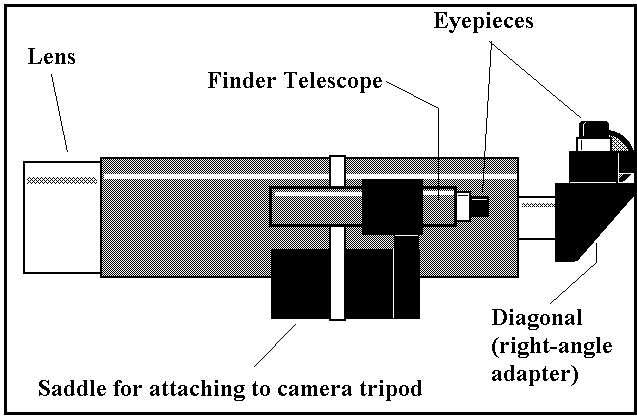
Probably the easiest to make, least expensive telescope is a refractor that uses a surplus lens from a photocopy machine or other large-format projector; hence, this has come to be known as a "copyscope". Over the past years, several members of our club have made these little scopes for themselves. The advantage of this telescope is that it offers a larger field of view and more light gathering than most telescopes sold in department stores. The drawback is that copy lenses were never intended for this application, so they're not able to achieve a sharp focus at high magnification. But for wide-field, low power views of the heavens these telescopes work great. And low power copyscopes themselves make good finder scopes when used on larger telescopes.
The total cost will vary depending on what equipment you already have on hand, and on whether you decide to add any refinements such as a commercially made rack and pinion focuser. If you make everything yourself, it will end up as a very economical bottom-of-the-line telescope that is still much better than anything you could buy in the store for the same price.
First, the Objective Lens
Where do you find one of these copy lenses? Typically, they're found in surplus ("junk") stores that carry used scientific equipment. In Chicago and Milwaukee, the American Science Center stores carry these lenses. Depending on the diameter, the typical lens costs from $12.00 to $15.00, although some of the larger ones can go as high as $40.00 or $50.00. The lens should be a compound system; that is, there should be two or more lenses mounted in a metal cell.
Once you've found a lens, the next step is to determine its focal length. (Do this before you buy it.) If you're lucky, the focal length or focal ratio will be imprinted on the cell. The larger the focal ratio, the better will be the images because longer focal lengths are more tolerant of optical design limitations. If the focal length is not shown, there are two fairly simple ways to determine it:
- Find a small lens in the store and hold it up to your eye in line with the copy lens in order to mimic the effect of an eyepiece. Move it back and forth until you can bring a faraway object into focus. The distance between the two lenses is roughly the focal length of the copy lens.
- If a small lens isn't handy, stand under a lighting fixture and hold the copy lens cell in a vertical position. Now take a piece of paper or something flat and hold it under the lens at the point where the image of the light bulb is projected most sharply. The distance between the lens and the paper is the focal length.
Knowing the diameter of the lens system and the focal length, you can calculate the focal ratio (focal length divided by lens diameter). Avoid any lens with a focal ratio less than f/3. If there are lenses with a variety of diameters that meet the focal ratio requirements, get the one with the largest diameter. The larger the diameter, the greater will be the light gathering ability. Of course, you might opt for a smaller lens in order to fit a tube that you already have on hand, to minimize the size and weight of the telescope, or if the smaller lens gives a better image.
The Tube
Here's where a well-equipped hardware store comes in handy! Most copyscope builders end up using a variety of different sizes of PVC tubing. If you can find thin-walled PVC tubing, use that for the main tube; your scope will end up a lot lighter in weight than if you were to use the standard thickness PVC. Another alternative is a heavy cardboard tube, such as those used with rolls of carpeting or heavy mailing tubes. The surplus store where you're buying the lens may also carry appropriate tubing. It's very rare that you will be able to find a tube that fits your lens cell exactly, so expect to do some shimming. The shim material may be several layers of duct tape wrapped around the lens cell or a strip of styrene plastic of the type carried in hobby shops. The lens will have to fit tightly enough so as not to fall out of the tube.
The length of the tube depends on the focal length of the objective lens and the amount of in-and-out travel needed for the focusing tube. If you choose to use a right-angle adapter (diagonal), that will require that the tube be cut shorter. Ultimately, you may have to use trial-and-error to arrive at the correct length, so at the outset, nothing should be permanently mounted.
To minimize reflections on the inside of the tube, paint the interior flat black, or line it with dull black cloth or paper. On a large copyscope, I also installed an aperture stop in the middle of the tube in order to cut down reflections. And just a cautionary note - if you paint the exterior of the tube, do so with the lenses far away from the work area; paint vapors and overspray carry paint particles a long way.
The Tailpiece
The tailpiece is simply the "back end" of the telescope, where the eyepiece is mounted. A piece of wood cut in a circle to match the interior of the tube works well. Use screws to attach it to the tube so it will be adjustable for alignment purposes and removable for cleaning of the inside surfaces. PVC end caps are also frequently used for tailpieces. If you use PVC fittings, you may have to "stack" two or three together to reduce the central hole so it's near the correct size for the focusing tube.
The simplest type of focuser is made by drilling a 11/4-inch hole directly in the center of a wooden tailpiece to accommodate a push-pull type focusing tube. An ideal focusing tube is a 11/4" x 6" chrome plated thinwall sink drain tube. This tube comes flared at one end so one side has an inside diameter of 11/4" and the other end has an outside diameter of 11/4". A typical 11/4" format eyepiece will fit nicely into the wider end of the focusing tube.
The focusing tube should move easily enough so that you can slide it in-and-out for focusing, but it should be tight enough so as not to fall out of the tailpiece. One solution is to cut a couple of ⅛" slits about ⅛ inch apart on the end of the focusing tube that is inside the telescope tube. Then bend the metal up so it makes a short tang at the end that will keep the tube from sliding out of the tailpiece. One refinement is to buy two of the sink drain tubes, then on one of them, cut off the piece that has an interior diameter of 11/4". This can be used as a sleeve in which the focusing tube can ride to make the in-and-out movement much smoother.
Right Angle Adapter
The telescope we've designed thus far will work perfectly well; however, as you look at objects high in the sky, you'll have to do a lot of bending and neck-craning. Uncomfortable, isn't it? The answer is to use a right angle adapter, also referred-to as a star diagonal. To buy one from a telescope supplier will set you back about $40.00, but they're not very difficult to make.
The diagram here shows how one can be put together. You can use either thin plywood or ⅛" thick plastic for the housing and 3/4" plywood for the ends that face the tailpiece and hold the eyepiece. Either a prism or front-surface mirror can be used to redirect the image. A mirror may be mounted simply by gluing it to the backplate of the adapter housing. On the other hand, a prism should not be glued in place because this causes the glued face to become transparent, rather than reflective. A prism can be held in place with small wooden or plastic shims. It's advisable to build the diagonal housing so that the mirror or prism can be adjusted slightly to aim the eyepiece line-of-sight directly down the telescope tube (i.e.: aligned along the optical axis).
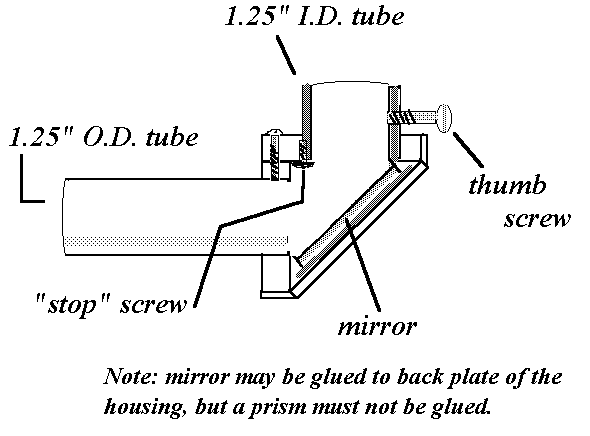
A piece of 11/4" outside diameter tubing is mounted on the face that goes into the tailpiece. The opening that accepts the eyepiece is drilled to 11/4"; if it ends up just a bit larger than the barrel of the eyepiece, that's okay. A very thin layer of rubbery silicon sealer wiped around the inside circumference will allow you to slide the eyepiece into the adapter, yet hold it tightly enough so that the inner end of the eyepiece barrel isn't resting on the prism or mirror. This also allows you to move the eyepiece a bit to fine-tune the focus. I prefer to also place a short, wide-head screw on the inside of the housing to act as a stop for the eyepiece so that it doesn't rest on the mirror or prism. A more elegant way to hold the eyepiece is to use a short piece of PVC tube as a sleeve. I also like to drill a small hole and insert a thumbscrew so that it can bear against the eyepiece just snuggly enough to keep the eyepiece from falling out of the adapter. It's also a good idea not to glue all of the parts together - have at least one of the pieces screwed in place so it's removable for cleaning and adjustment of the optical element.
�
Alignment of the Lens and Eyepiece
A telescope requires perfect alignment of the optical elements. This means that the tailpiece should be square with the objective lens. Before everything is finally screwed together, take a look down the focusing tube toward the objective lens. Does it look as though you're aimed at the center of the objective lens?
To check this more precisely, make a "centering eyepiece" using a plastic 35mm film canister. Cut the bottom out of it, punch a small hole directly in the center of the lid, and then place it in the focusing tube. (Note that the outside diameter of a Kodak film canister is exactly 11/4" - others probably work, as well.) This will ensure that as you look down the focuser tube to check the alignment, your eye will be positioned directly in the center. An uncut film canister also works great as a way to plug the telescope tube when the eyepiece is removed in order to keep dust and debris from getting inside your scope.

Mounting the Copyscope
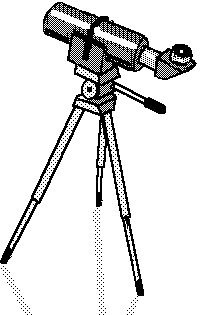
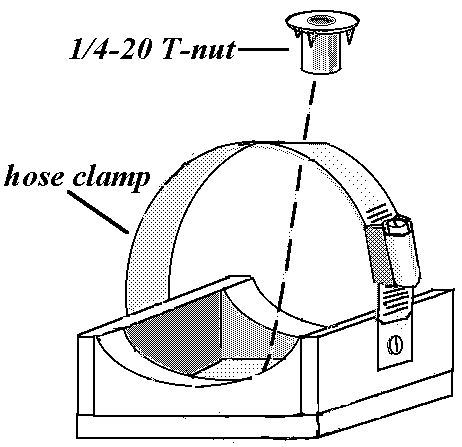
To use your telescope, you'll need to hold it steadily. In other words, it'll have to be mounted on a tripod. It's very simple to make a yoke that will hold the scope and can be mounted to the 1/4-20 screw that is common on the pan heads of photographic tripods. As shown below, two vertical pieces have semi-circular cutouts to accept the telescope tube. The telescope can be held in place with an adjustable strap-type pipe clamp. A 1/4-20 T-nut is mounted in the base so the camera-mounting screw on the pan head of the tripod can engage it.
Wrap-Up
The steps covered here for building a copyscope haven't gone into precise detail, simply because the actual dimensions and positioning of the optical elements will depend on which objective lens you're able to get. At the beginning, I had noted that the lenses used for copyscopes do not allow high magnification. Even using low power, you may find that while stars at the center of the field will be in focus, those at the edge of the field may be slightly out of focus. The quality of the low magnification image can be improved through the use of a well-corrected eyepiece, such as a good Orthoscopic, Plossl, or one of the newer, more exotic designs. If this will be your first telescope and you will also have to buy an eyepiece, it may seem odd to spend two or three times the cost of the telescope on the purchase of an eyepiece. But a good eyepiece is well worth the price because it can somewhat compensate for the shortcomings of the objective lens. Experience has shown that an eyepiece with a focal length of 18mm to 20mm is the ideal size for use with a copyscope. A magnification of 12x to 24x is about right for most telescopes of this type.
Although this little scope has a wide field of view, you may find it helpful to add some sort of aiming device. This could be an inexpensive finder scope, a sighting tube, or a type of V-sight used on rifles. You'll enjoy making the copyscope, and feel free to experiment as you go. In the end you will experience the greatest satisfaction of the telescope builder - touring the universe with a telescope that you yourself have made.
Published in the December 1999 issue of the NightTimes


